Speed up Visual Studio by turning off the Source Control Plug-in

I don’t use the built in source control plug in Visual Studio as I use GitKraken instead, so Visual Studio’s plug-in just sat in the background not doing much as far as I could see.

Then out-of-the-blue I got a notification that it was slowing down Visual Studio and I should turn it off if I don’t rely on it. Fair enough, I don’t use it, it can go.

Open the Options dialog

Open the options dialog by going to the Tools→Options… menu item

Find the Source Control Plug in Section

Type Source Control Plug-in Selection in the search box and press enter

Change the drop down to None and then press OK.

If you have a solution open, it will likely tell you it has to close the solution.

That’s it!

Why is my app not responding? Oh… I’ve hit a breakpoint!

Have you ever run your app from Visual Studio to have it suddenly stop responding and you can’t immediately see why, only to discover that you’ve hit a breakpoint and didn’t realise because Visual Studio is now running behind the window you’re looking at (or on a monitor you weren’t looking at). Well, as of Visual Studio 17.4 (November 2022 release) you can now assign a sound to hitting a break point so that you get an audio warning when that happens.

To get this, first go to Tools–>Options, and typing “Audio Cues” into the search, then checking the “Enable Audio Cues” check box.

Next you have to open up the system sounds dialog in order to assign a sound to the event. From the Windows Start Menu search for “Change System Sounds”

And then selecting the “Sounds” tab, and scolling to the “Microsoft Visual Studio” section and selecting “Breakpoint Hit” as the event. You can then assign a sound to the event.

Once you apply this change, you will then get an alert sound when a breakpoint is hit while you are debugging your code.

Two Factor Authentication with GitHub and Visual Studio 2013

New job, new tools, new processes. In my new job we’re using GitHub for source control, and because the data is sensitive we’re also using two factor authentication. Because I develop with Visual Studio that presents and interesting issue if you are using Visual Studio 2013’s build in Git Source Control provider.

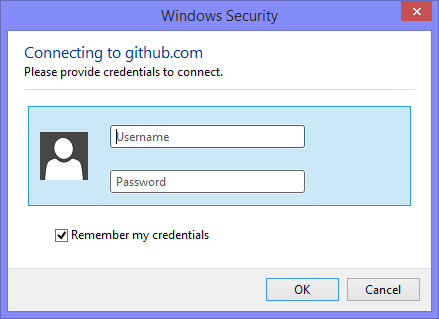
After turning on Two Factor Authentication, the next time you have to communicate with GitHub (e.g. pull/push/sync’ing, etc.) it will pop up a dialog asking for your credentials, even if you already entered them previously before turning on 2FA.

You get an error message that looks like this:

An error occurred. Detailed message: An error was raised by libgit2. Category = Net (Error).
Response status code does not indicate success: 401 (Authorization Required).

Entering your credentials won’t do you any good. It won’t work. It will just request them again, ad infinitum.

There is no where to enterthe 2FA code, so you can’t authenticate yourself here.

However, you can go to GitHub and create a personal access token in order that Visual Studio 2013 can access your repositories.

You can either drop down the menu on your avatar and go to “Settings”, then go to “Personal Access Tokens” (link in the side bar) or you can just go here https://github.com/settings/tokens.

Then click on “Generate New Token”. You’ll be asked for your credentials again just to be sure you are still you.

Once you’ve done that you’ll be taken to the page to create your credentials

For what Visual Studio wants the default permissions are fine. Also, give the token an appropriate name so it can be identified easily.

Then press “Generate token”.

You will then be taken back to the “Personal access tokens” page. This time there is a new token which you can use in Visual Studio. Be careful here, this is the one and only time you will be able to access this token so copy it and keep it safe.

Back in Visual Studio try and sync the commits to GitHub. It will pop up the credentials dialog again. This time you are going to enter the token in the username box and leave the password box blank.

Then press OK.

Finally, your changes will sync with GitHub and you’ll get a success message.

Tip of the day: Default project location in Visual Studio

When rebuilding a machine I always end up hunting this setting down just after installing Visual Studio because I keep forgetting where it is. I never put my projects in my documents directory. Ever.

In Visual Studio go to Tools –> Options... then navigate to “Projects and Solutions” and in the “General” section change the “Projects location” to the one you want.

Visual Studio Options dialog

Previewing Config Transforms

Curiously, I didn’t know about this until recently and it is such a useful thing too.

You can preview the results of your configuration transformation from within Visual Studio.

First of all, right click the transform file and select “Preview Transform”

Then it will show you the differences between the original web.config file and the transformed file.

Really getting the latest changes with TFS

TFS Source Control doesn’t always get the latest changes. It gets what it thinks are the latest changes (and for the most part it gets it right if you work exclusively in Visual Studio). However, there are times when it gets it wrong and you have to force its hand a little.

So, if you have issues getting latest code then what you need to do is:

  • Right click the branch or folder that is problematic
  • Go to the “advanced” sub-menu and click “Get Specific Version…”
  • Then in the dialog check the two “overwrite…” boxes
  • Finally, press “Get”

At this point VS/TFS will retrieve all the files in the branch/folder selected and overwrite existing files. It will also retrieve files it didn’t already have, even although it thought it had them.

How to recover deleted files, folders and branches in TFS

In Visual Studio go to the menu item Tools–>Options…

Then navigate to the Source Control –> Visual Studio Team Foundation Server section.

In that section is a check box that says “Show deleted items in the Source Control Explorer”

Once you’ve ensured that the checkbox is checked, press “OK”

Then navigate to the Source Control Explorer and you’ll see that deleted files, folders and branches are now displayed with a large red cross next to them.

Right click the item you want to recover and select “Undelete” from the menu.

At this point Visual Studio stops responding to input. It displays a wait spinner briefly, but mostly it just looks like it has hung.

When Visual Studio does come back to life you can go to the Pending Changes to see the newly recovered files, folders, or branches.

If you are happy with this change, you can check it in to TFS as normal.

There were build errors. Would you like to continue and run the last successful build?

Oh, Would I! Could I really do that?!?  Well yes, but I cannot think of any situation where I would want to do this. I’m not saying there isn’t a time I might conceivably possibly maybe actually want this, but I can’t think of it right now and I’ve not come across that situation for as long as I can remember getting this stupid dialog..

Now, obviously you can press the “Do not show this dialog again” and press “No” and it will remember that as your default choice. However, what if, like me, you were a bit ham fisted and accidentally pressed “Yes” and then wonder why your latest changes simply don’t work. How do I fix that? There’s no dialog any more.

The setting is accessible from Visual Studio’s Options dialog. You can get to by going to Tools–>Options:

In the options dialog go to Projects and Solutions—>Build and Run

There you will see the option "On Run, when build or deployment errors occur:" and a drop down indicating the action. Change the drop down to "Do not launch" in order to ensure that your application does not launch when a build error occurs.

While we are here, do you ever want to run your application when the projects are out of date? I can’t think of any time I’ve wanted to do that. There is an option to stop prompting you do do that and just “always build” in that case.

Once you’ve made your changes, press “OK” to save the changes.

Node.js – Setting up a basic development environment

Node.js is a platform for executing JavaScript outside of the browser. It runs on the Google V8 engine which effectively means it is cross platform as it can run on Windows, Mac OS X, and Linux.

Since JavaScript written for Node.js is running on one platform issues that plague browser based JavaScript does not occur on Node.js. There are no “Browser Compatibility” issues. It simply runs ECMAScript 5.

Installing

To install Node.js download the installer from the node.js homepage. The “Install” button should give you the correct installer for the platform you are on, but if not, or your are downloading for a different platform you can get a list of each download available, including source code.

One thing I really like about the windows installer is that it offers to add Node.js to the PATH. Something that more developer tools should do.

Writing JavaScript for Node.js

While you can use a basic text editor, or even a more sophisticated text editor, IDEs are also available for writing node.js.

IDE – Node.js Tools for Visual Studio

There is a plug in for Visual Studio that is in beta (at the time of writing) which allows you to create node.js projects. This is very useful if you are doing cross platform development interacting with .NET based applications, or if you are simply used to working with Visual Studio. I like this option because I’ve been working with Visual Studio since version 2.1 (that came out in the early-to-mid-90s).

To get the extension for the Node.js tools for Visual Studio, go to http://nodejstools.codeplex.com/. If you don’t want to default download (which is for the latest version of visual studio) go to the downloads tab and select the appropriate download for your version of Visual Studio.

In the future, I would expect it to be available directly in Visual Studio through the Tools->Extensions and Updates… manager.

Once installed, you can create a new node.js project in the same way you’d create any new project. The Extension will have added some extra options in to the New Project dialog.

You can set break-points, examine variables, set watches and so on. The following is an example of a very simple Hello World application with a break point set and the local variables showing up in the panel at the bottom.

IDE – JetBrains Web Storm

If you don’t already have Visual Studio it may be an expensive option. JetBrains Web Storm is another IDE that allows you to create Node.js applications with a similar set of features to the Visual Studio extension above. Personally, I find Web Storm a little clunky but it works across Windows, Mac OS X, and Linux. If you don’t already have access to Visual Studio it is a much less expensive too.

Text Editors

Besides IDEs you can always use text editors. Some are more advanced than others.

The text editor I hear most about these days is Sublime, which can be more expensive than WebStorm depending on the license needed.  Sublime is a very nice looking text editor and it has its own plug-in system so can be extended, but for roughly the same money you could get a fully featured IDE.

Summary

I’ve not really gone all that much into the text editors available that support developing for JavaScript with Note.js because I don’t feel they really add much. A fully featured IDE with refactoring support is much more important to me. Maybe installing ReSharper corrupted me.

Using Contracts to discover Liskov Substitution Principle Violations in C#

In his book Agile Principles, Patterns, and Practices in C#, Bob Martin talks about using pre- and post-conditions in Eiffel to detect Liskov Substitution Principle violations. At the time he wrote that C# did not have an equivalent feature and he suggested ensuring that unit test coverage was used to ensure the same result. However, that does not ensure that checking for LSP violations are applied consistently. It is up to the developer writing the tests to ensure that they are and that any new derived classes get tested correctly. Contracts, these days, can be applied to the base class and they will automatically be applied to any derived class that is created.

Getting started with Contracts

If you’ve already got Visual Studio set up to check contracts in code then you can skip this section. If you don’t then read on.

1. Install the Code Contracts for .NET extension into Visual Studio.

2. Open Visual Studio and load the solution containing the projects you want to apply contracts to.

3. Open the properties for the project and you’ll see a new tab in the project properties window called “Code Contracts”

4. Make sure that the “Perform Runtime Contract Checking” and “Perform Static Contract Checking” boxes are checked. For the moment the other options can be left at their default values. Only apply these to the debug build. It will slow down the application while it is running as each time a method with contract conditions is called it will be performing runtime checks.

Visual Studio Project Properties

You are now ready to see code contract issues in Visual Studio.

For more information on code contracts head over to Microsoft Research’s page on Contracts.

Setting up the Contract

Using the Rectangle/Square example from Bob Martin’s book Agile Principles, Patterns and Practices in C# here is the code with contracts added:

public class Rectangle
{
    private int _width;
    private int _height;
    public virtual int Width
    {
        get { return _width; }
        set
        {
            Contract.Requires(value >= 0);
            Contract.Ensures(Width == value);
            Contract.Ensures(Height == Contract.OldValue(Height));
            _width = value;
        }
    }

    public virtual int Height
    {
        get { return _height; }
        set
        {
            Contract.Requires(value >= 0);
            Contract.Ensures(Height == value);
            Contract.Ensures(Width == Contract.OldValue(Width));
            _height = value;
        }
    }
    public int Area { get { return Width * Height; } }
}

public class Square : Rectangle
{
    public override int Width
    {
        get { return base.Width; }
        set
        {
            base.Width = value;
            base.Height = value;
        }
    }

    public override int Height
    {
        get { return base.Height; }
        set
        {
            base.Height = value;
            base.Width = value;
        }
    }
}

The Square class is in violation of the LSP because it changes the behaviour of the Width and Height setters. To any user of Rectangle that doesn’t know about squares it is quite understandable that they’d assume that setting the Height left the Width alone and vice versa. So if they were given a square and they attempted to set the width and height to different values then they’d get a result from Area that was inconsistent with their expectation and if they set Height then queried Width they may be somewhat surprised at the result.

But there are now contracts in place on the Rectangle class and as such they are enforced on Square as well. “Contracts are inherited along the same subtyping relation that the type system enforces.” (from he Code Contracts User Manual). This means that any class that has contracts will have those contracts enforced in any derived class as well.

While some contracts can be detected at compile time, others will still need to be activated through a unit test or will be detected at runtime. Be aware, if you’ve never used contracts before that the contract analysis can appear in the error and output windows a few seconds after the compiler has completed.

Consider this test:

[Test]
public void TestSquare()
{
    var r = new Square();
    r.Width = 10;

    Assert.AreEqual(10, r.Height);
}

When the test runner gets to this test it will fail. Not because the underlying code is wrong (it will set Height to be equal to Width), but because the method violates the constraints of the base class.

The contract says that when the base class changes the Width the Height remains the same and vice versa.

So, despite the fact that the unit tests were not explicitly testing for an LSP violation in Square, the contract system sprung up and highlighted the issue causing the test to fail.